Table of Contents
1. Authenticate and Install Decisions
- Decisions offers an add in for Teams, Outlook and Word/PowerPoint
- Each add in can be centrally distributed:
- When installing Decisions you will be asked to authenticate and accept Terms & Services
Decisions is made for Microsoft M365 and can only be used with a Microsoft Work or School account
2. Approve Decisions as an Enterprise Application for your organization
- Decisions is made to work with the tools you already use, and to take advantage of Decisions you need to enable it as an Enterprise Application in your Organization's Microsoft Environment (Tenant). This allows Decisions to work with your existing calendar, meetings, groups and teams, and make sure that all your data stays within your organization and is stored in your cloud or on your servers
- For security and data protection reasons Decisions will not work unless it is integrated in your environment
-
The approval and integration is usually completed by the Microsoft Admin in your IT organization, click here to see a more details
3. Create Agenda
-
- Select existing meeting or create a new meeting first
When you open Decisions, you will see a list of your or your team's meetings, these come from the Teams/Outlook calendar. To create an agenda, just select a meeting from the list. If you don't see any meetings or you want a different one for testing purposes, create a new meeting in your calendar first by clicking "Add" and "New Meeting" from your Decisions dashboard.
- Creating an Agenda
Decisions provides several options for creating an agenda for a meeting or meeting series, and you can start from scratch, use a pre-made template, or the AI Agenda Assistant.
- Choose storage location
To create an Agenda, you first need to select where to store the Agenda and potential associated files.- Select a Teams Team/Channel or O365 Group to easily collaborate with Meeting Attendees. This allows for default access for team/group members.
- Select OneDrive to store the agenda when you it is no applicable team/group or it is an ad-hoc or cross-functional meeting.
- You can also create a new Teams Team/Channel or O365 Group if you want to test Decisions in a separate location.
- Add Agenda Topics and details
Create your first agenda, add agenda topics and description, set the allocated time, assign presenters and add attachments.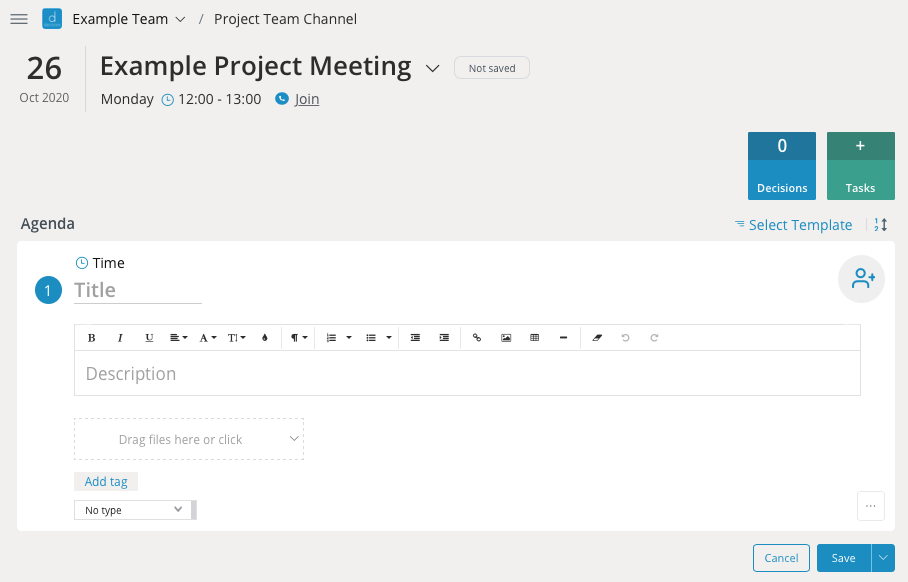
- Save Agenda and/or add more Agenda Topics
As you build out your Agenda, you can add several topics, assign tags and set the type of an Agenda Topic. This makes it easier to know the purpose and look up past Agenda Topics.
- Select existing meeting or create a new meeting first
For more detailed explanation on how to create an agenda, go to Decisions for Teams or Decisions Meeting Secretary for Outlook
4. Share Agenda
-
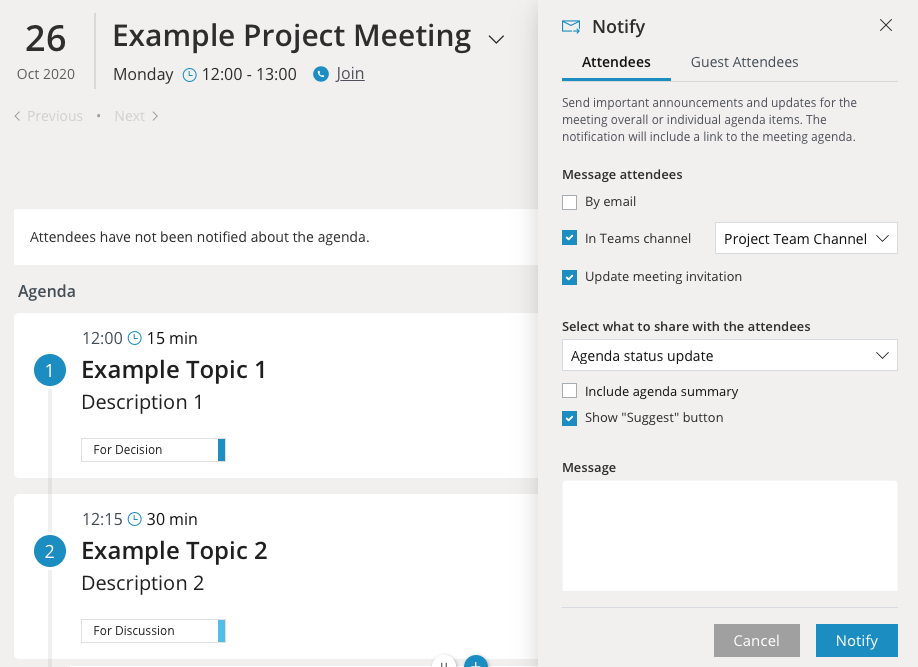
- Open the notifications panel from the sidebar menu or click the button above your Agenda Topics labeled Notify Attendees
- Choose if you want to send the Agenda by Email, post it in the Teams Channel, update the meeting invitation, or all of the above
- You can also add a Message and choose to include an agenda summary as well as allowing participants to submit suggestions for additional Agenda topics
5. Run Meeting
-
- Before the meeting
- If you haven't already done so, remember to enable recording/transcription of the meeting to leverage the full capabilities of Decisions.

- If you haven't already done so, remember to enable recording/transcription of the meeting to leverage the full capabilities of Decisions.
- Using Decisions In-Meeting
When starting a meeting in Teams with Decisions app, you will be able to view the Decisions in-meeting side panel.
- Decisions in-meeting app
- Maintain overview of the agenda, view presenters, time left per agenda item

- Assign tasks

- Log a decision that was set up before, or during the meeting

- Maintain overview of the agenda, view presenters, time left per agenda item
- Before the meeting
6. Follow-up from Meeting
- Create Minutes document
You can create a Minutes document by clicking the + button above Minutes in the Agenda. Decisions will give you two options to create the document:- Manually document Minutes during or after a meeting with edit and sharing functionality in Word or OneNote.
- Use the AI Minutes Assistant to gather relevant meeting content, including the meeting transcript, agenda topics, meeting chat, and more, and generate the minutes. You can also chat with the AI Assistant to refine the document in real time before merging it into a Word or OneNote Minutes document.

- Share Meeting Minutes
You can share Meeting minutes immediately at the conclusion of the meeting or send them out for review before you publish.

-
- Review past Agendas, decisions and tasks in Decisions
In Decisions you can see all the information from past meetings. You can use Decisions to manage the decisions you make and the tasks you assign and complete over time.

- Review past Agendas, decisions and tasks in Decisions